Your Figma Make Guide to Automating Design Workflows
Use this Figma Make guide to automate your design process. Learn how to connect Figma to Make, build interactive prototypes, and validate designs with Uxia.

If you’re trying to connect Figma with an automation tool like Make.com, you have to start with a clean, organised workspace. This isn't just about being tidy—it's about creating a predictable system that external tools can reliably understand and interact with. A solid foundation is what prevents your automations from constantly breaking, saving you from endless manual fixes and frustrating debugging sessions.
Practical Recommendation: Before you begin, audit your current Figma files. Identify one project file that is poorly organized and use it as a test case to apply the organizational principles in this guide. This hands-on practice will make the process much clearer.
Build a Rock-Solid Figma Foundation
Before you even touch an automation workflow, your Figma files need to be impeccable. From my experience, a messy workspace is the number one reason automated workflows fail. You end up with broken connections, incorrect asset exports, and hours wasted trying to figure out what went wrong.
The goal here is to structure your designs so they behave like a well-documented API. When every element is named correctly and every component is built with constraints, automation becomes a simple plug-and-play process. This organized approach is also crucial for seamless integration with testing platforms like our own, Uxia, which rely on a structured design to run effective AI-powered tests.
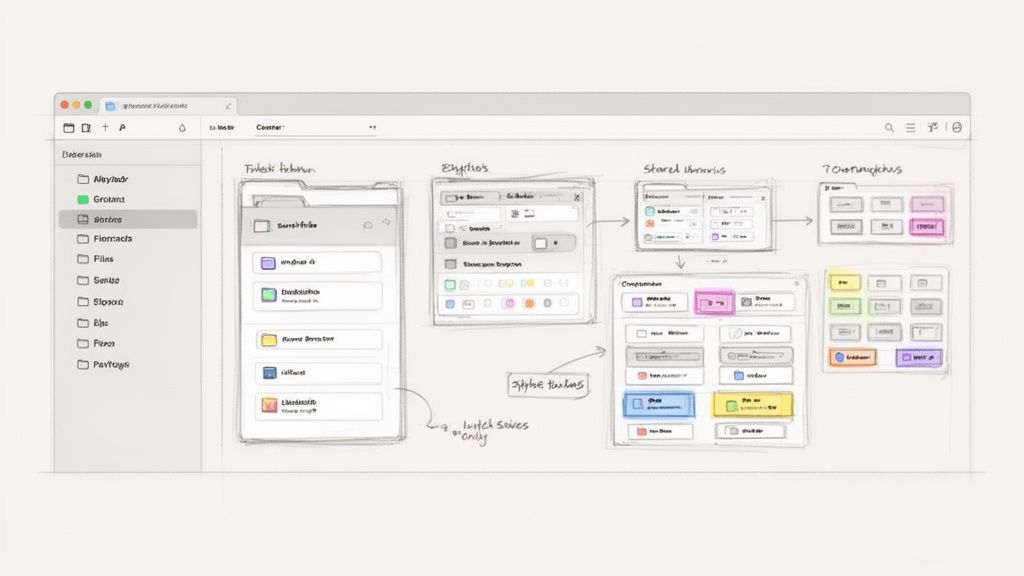
Establish a Practical Naming Convention
A consistent naming convention is your first line of defence against chaos. Without one, finding the right component or layer feels like a treasure hunt, both for you and for any tool trying to parse your file.
The best strategy I've found is using a forward-slash (/) to group related elements. It creates a clear hierarchy right inside Figma.
For example, structuring your button components this way works wonders:
button/primary/defaultbutton/primary/hoverbutton/secondary/defaultbutton/secondary/hover
This method doesn't just organise your library; it makes the components easily identifiable for a Make.com scenario. When an automation needs to "watch" for changes to primary buttons, it can target the entire button/primary/* group instead of forcing you to specify every single variant.
Practical Recommendation: Use a Figma plugin like "Rename It" or "Automater" to retroactively apply your new naming convention to existing files. This saves hours of manual work and ensures consistency across all your projects.
A clean design file is a non-negotiable prerequisite for automation. Make can’t automate what it can’t understand. The time you spend organising layers and naming components now will save you ten times that during the automation and testing phases.
Master Auto Layout and Constraints
Auto Layout is the engine that makes your designs responsive and truly scalable. Before connecting your file to Make, you have to make sure all your frames and components are using it properly. This practice ensures that when you make a change—like adding a new item to a list or swapping out text—the layout just works.
This is critical for two big reasons. First, it mirrors how real front-end components behave, which makes your designs far more realistic. Second, it stops your layouts from breaking the moment you use Make to populate them with dynamic content.
Practical Recommendation: To test your Auto Layout setup, create a "stress test" frame. Duplicate your component and try to break it by adding extremely long text or removing elements. If the layout adapts correctly, it's ready for automation. If it breaks, you've found a weak spot to fix.
Imagine an automation that creates new tasks in a to-do list component. With a proper Auto Layout setup, each new task will stack perfectly without you lifting a finger. I’ve seen countless automations fail because this step was skipped, resulting in designs that look jumbled and unprofessional. Choosing the right design tools and mastering their core features is the bedrock of an efficient workflow.
Centralise Everything in Shared Libraries
Stop working in isolated files. Your core UI elements—colours, typography, icons, and components—should all live in a dedicated Shared Library. Any project that needs these assets should link to this library, not duplicate them.
This approach gives you a single source of truth. When you update a component in the library, every design file that uses it gets a notification to accept the change. This is absolutely essential for maintaining brand consistency and preparing for validation.
Later, when you’re ready to test your prototypes with a platform like Uxia, you’ll want to be certain the design reflects the most current, approved components. This centralisation guarantees that your entire system—from design to automation to testing on Uxia—is operating on the exact same set of rules.
Create Prototypes That Feel Real
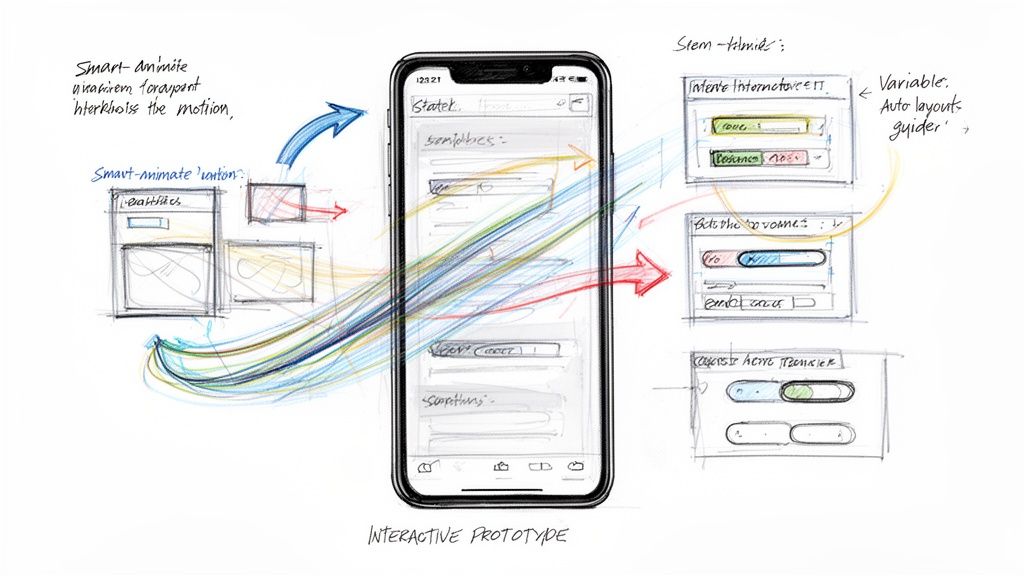
Static designs only tell half the story. To really get a feel for a user experience, you have to bring it to life with high-fidelity, interactive prototypes. This is the point where you stop dealing with flat images and start building flows that actually mimic how the final product will behave.
A solid prototype is an incredibly powerful tool. It lets stakeholders truly see and feel your vision, and it creates a realistic foundation for user testing long before a single line of code gets written. As you’ll see in this Figma Make guide, a realistic prototype is the critical asset you'll eventually test and automate.
Beyond Basic Clicks
Building a prototype that feels authentic is about more than just linking screens together. Figma gives you a whole suite of tools to create the kind of nuanced, dynamic interactions that define a modern user journey.
There are three features you absolutely need to master:
Smart Animate: This is your secret weapon for fluid micro-interactions. It automatically animates matching layers between two frames. If a button changes size and position from a 'default' frame to a 'hover' frame, Smart Animate handles the smooth transition, making it feel alive.
Variables: Forget creating dozens of duplicate screens. Use variables to manage states and create dynamic content that remembers user selections, calculates totals in a shopping cart, or switches between light and dark modes.
Interactive Components: This is where things get really efficient. By creating component sets with variants (like a checkbox with 'unchecked' and 'checked' states), you can build the interaction right into the component itself. Every instance of that component in your design will then be interactive by default.
Your goal isn't just to show what the app looks like, but to demonstrate how it works. A prototype that correctly uses variables and interactive components tells a much richer story and uncovers potential usability problems early on.
This focus on advanced prototyping is taking off. The UK, for instance, leads the European design scene in Figma adoption, with 6.5% of global Figma companies based there. That translates to around 7,200 businesses, showing just how standard sophisticated prototyping and validation have become. You can find more insights on these trends at WebbyCrown.
Connecting Prototypes to Your Design System
Your interactive elements shouldn't live in a silo. For your prototypes to be scalable and easy to maintain, every interactive component must be part of your design system, connected through variants and Auto Layout.
Practical Recommendation: Create a dedicated "Prototyping" page in your design system file. Here, you can build and document common user flows using your interactive components, like a full login sequence or a checkout process. This creates reusable, pre-validated flows for future projects.
Take a button component, for example. Don't just make one. Build a full component set with variants for every possible state:
Default
Hover
Pressed
Disabled
Loading
This organised approach pays off massively when you're prototyping. You can swap between states in an instant to create realistic flows. This level of detail is exactly what enables seamless validation on platforms like Uxia.
When you send your prototype for testing, you need to be confident that every element behaves as expected. By building on a robust design system, you guarantee that the AI synthetic users on Uxia are interacting with a consistent, predictable interface. That, in turn, gives you far more reliable feedback on friction points.
Unlock Powerful Automation With Make
Alright, your designs are organised and your prototypes feel surprisingly real. What's next? It's time to connect the dots and get rid of the mind-numbing manual work that slows everyone down. This is where the Figma and Make connection really starts to pay off, building a bridge between your design files and your team’s other tools.
Forget about manually exporting assets, updating Trello cards, or chasing down developers on Slack. By hooking Figma up with Make, you can automate all those tedious tasks. This frees up your team to focus on what actually matters—designing great products and shipping them.
Connecting Your Accounts
First things first, you need to establish a secure connection between the two platforms. Inside your Make account, you’ll kick things off by creating a new scenario and adding the Figma module. Make will then ask you to create a connection, which means you’ll need to generate a personal access token from your Figma account settings.
Think of this token as a secure key that gives Make permission to peek into your Figma files and take action. It's a quick and painless process:
In Figma, navigate to your Account Settings.
Scroll down to the "Personal access tokens" section.
Create a new token, give it a clear name like "Make.com Integration," and copy it to your clipboard.
Paste that token back into the connection prompt in Make.
Practical Recommendation: Keep your access tokens secure. Use a password manager to store them and create different tokens for different applications. This way, if one application's access is compromised, you can revoke its specific token without disrupting other integrations.
With that simple authentication done, you've just given Make the power to listen for specific events in Figma and trigger workflows in all your other apps.
Your First Automation Scenario
Let’s build a classic, incredibly useful automation: notifying your team on Slack when a design is ready for review.
Start by adding the Figma module to your Make scenario and picking the "Watch Comments" trigger. This module keeps an eye on a specific Figma file for any new comments. You can even fine-tune it to only fire when a comment includes a certain keyword, like "#review".
Next, add the Slack module and choose the "Create a Message" action. This is where the magic happens. You can map the data from the Figma trigger directly into your Slack message. For instance, you can pull in the commenter's name, the full comment text, and a direct link to the exact Figma frame.
Now, whenever a designer drops a comment like, "Hey @developer, this is ready for #review," Make will instantly post a clean, formatted message in the right Slack channel. No more context switching or manual copy-pasting.
The real power here is the ripple effect. What starts as a simple notification can grow into a full-blown workflow that updates a project's status in Asana, creates a testing ticket in Jira, and even preps the prototype for validation on a platform like Uxia.
This blend of design and automation is picking up serious steam. The AI-driven features in both Figma and its connected tools have exploded, especially in Europe, where weekly active user engagement has shot up by over 70% quarter-over-quarter. It's also telling that over 80% of Make users on full seats also use Figma Design, which shows just how intertwined these tools are becoming in modern workflows.
Practical Figma and Make Automation Scenarios
Here’s a look at some practical scenarios you can build by connecting Figma and Make.
Scenario | Figma Trigger | Make Action | Benefit |
|---|---|---|---|
Design Review Notification | New comment with | Post a message in a Slack channel | Instantly notifies developers and PMs, with a direct link to the frame. |
Asset Export to Cloud | A frame is added to a specific page | Export frame as PNG/SVG, upload to Google Drive/Dropbox | Automates asset delivery, ensuring the latest versions are always available. |
Project Board Update | A file's status is changed (e.g., in the title) | Find and update a card in Trello/Asana/Jira | Keeps project management tools synchronised with design progress automatically. |
New Version Announcement | A new version is saved in Figma | Send an email to stakeholders via Gmail/Outlook | Informs the wider team about major updates without manual communication. |
Trigger Uxia Validation | Frame moved to "Ready for Testing" page | Create task in project tool to run a Uxia test | Automatically initiates the user testing process, ensuring no design moves forward without validation. |
These are just starting points, of course. The key is to identify your team's unique bottlenecks and build automations that solve those specific problems.
Expanding Your Automation Playbook
Once you've got the hang of the basics, you can start building more sophisticated scenarios. The possibilities are pretty much endless, and the best automations are the ones that solve your team's most painful, repetitive tasks. To get some ideas, check out our guide on implementing a data-driven design approach to pinpoint which manual tasks are costing you the most time.
If you want to go even deeper and understand the broader shift toward intelligent workflows, it’s worth reading up on how AI agents are reshaping business processes. It provides great context on how this trend is changing product development across the board.
Close the Loop with AI-Powered Validation on Uxia
So, you’ve used a Figma Make.com workflow to speed things up, but is the design actually any good? An efficient process is great, but it means nothing if the final product doesn't work for your users.
This is where you close the feedback loop. Instead of waiting weeks for traditional user testing, you can validate your designs almost instantly by integrating our platform, Uxia.
Once your interactive Figma prototype is ready, you just upload it directly to Uxia. The whole process is built to get you from a polished prototype to actionable insights in a matter of minutes.
How AI Synthetic Users Work
The real magic happens when you define a mission for AI synthetic users on our platform. These aren't just mindless bots; they're sophisticated AI personas crafted to mirror the specific demographic and behavioural traits of your target audience.
You give them a task—like "sign up for a new account" or "find and purchase a specific product"—and Uxia's synthetic users will navigate your prototype to get it done, thinking aloud as they go.
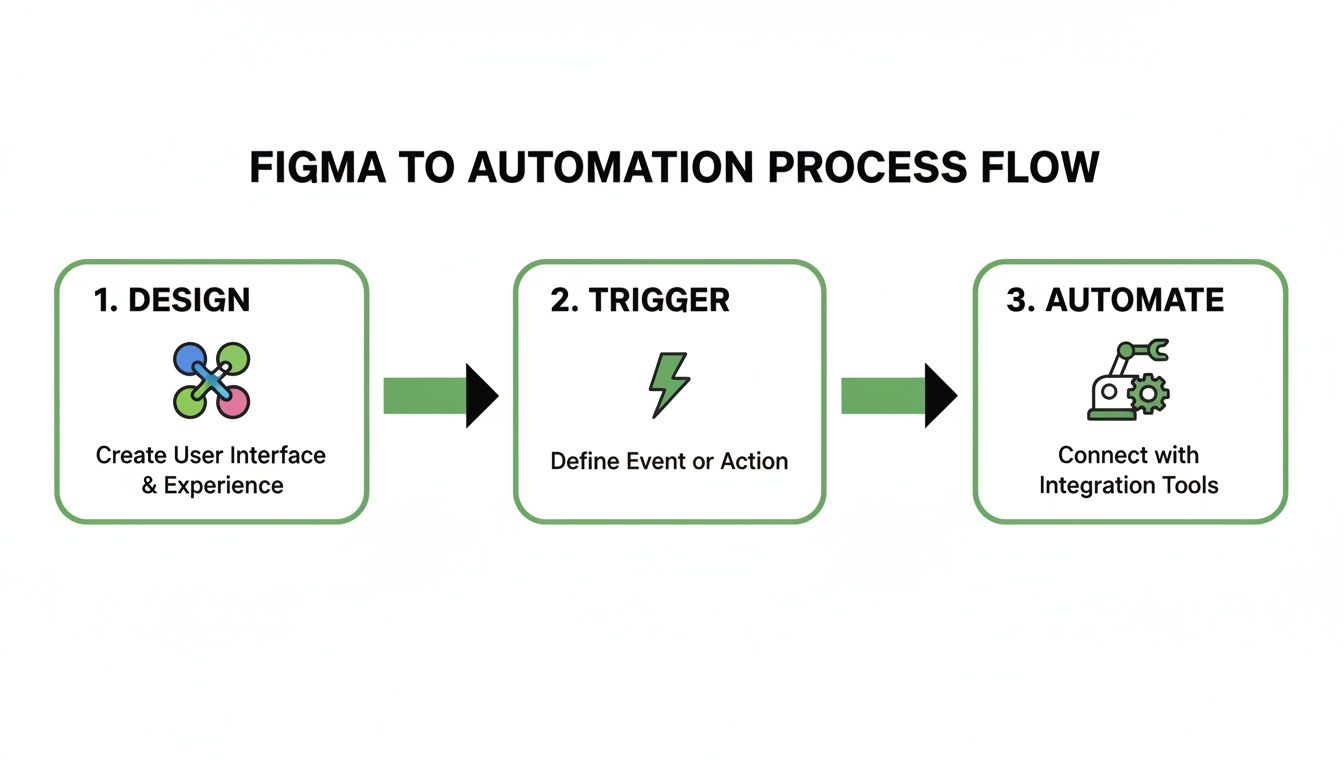
This diagram shows how your design, the automation trigger, and the final action all connect to create a testable product.
It’s a simple flow: from the initial design in Figma to an automation trigger, which then prepares your prototype for immediate validation on Uxia.
Getting Feedback You Can Actually Use
Forget waiting around for traditional usability studies. With Uxia, you get a comprehensive report almost immediately that highlights specific points of friction in your design.
The aim is to shift from "I think this works" to "I know this works." Uxia gives you the data-backed confidence to make smart design decisions quickly, ensuring your accelerated workflow leads to products people love.
While design teams are increasingly comfortable with their tools—71% of designers and 75% of developers in Europe are happy with their current setups—there's a major trust gap when it comes to AI. Roughly 40% distrust AI completely.
Uxia helps bridge this gap by providing transparent, unbiased feedback, like heatmaps that show rage clicks (39.6% of which are often missed in human testing). And given that 75% of designers use Figma, integrating a fast, reliable testing solution is no longer a luxury. You can find more of these stats in Figma's resource library.
From Data to Decisive Action
Uxia’s reports are built for clarity and speed. You'll get:
Think-aloud transcripts: A running commentary from the synthetic users as they interact with your prototype, revealing their thought process, hesitations, and frustrations.
Heatmaps and click paths: Visual evidence of where users are clicking, getting stuck, or missing key elements.
Prioritised insights: The platform automatically flags and ranks usability issues—from confusing navigation to unclear copy—so you know exactly what to fix first.
Practical Recommendation: Take the top three prioritized insights from your first Uxia report. Assign each one as a task in your project management tool, fix them in Figma, and re-run the test on Uxia. This creates a rapid, measurable iteration cycle that proves the value of AI-powered testing to your team.
This instant feedback loop means you can iterate on your design, re-test it, and validate the changes all in a single afternoon. To learn more about how this works in practice, check out our guide on synthetic user testing.
It’s how you make sure your efficient, automated workflow produces designs that aren’t just built fast, but built right.
Troubleshoot Common Workflow Hiccups
Even the most carefully planned automation hits a snag now and then. Connecting Figma and Make.com is a game-changer, but it’s not always a perfectly smooth ride. Think of this section as your field guide for squashing the common bugs that pop up.
Don't get discouraged when an automation doesn’t fire or a connection breaks. These are normal growing pains. The real skill is learning how to diagnose the issue quickly so you can get back to designing instead of debugging.
When Your Automation Trigger Fails
So, you’ve dragged a frame to your “Ready for Review” page, but… nothing. No Slack notification, no new task in your project manager. What gives? This is probably the most frequent hiccup, and it’s almost always a simple mismatch.
Make is incredibly literal. If your trigger is configured to watch for a change, it needs the exact conditions to be met.
Check Your Naming. Seriously. If the trigger is looking for a page named
Ready For Dev, it will completely ignore a page calledReady for Dev. Capitalisation, spelling, and even extra spaces matter.Verify Your Permissions. Does the personal access token you generated for Make have the right permissions to read your file’s content? Without it, Make is flying blind and can't see the changes you're making.
Remember the Polling Interval. Make doesn’t check Figma in real-time on every plan. It “polls” for updates at set intervals. Sometimes, the solution is just to wait a few minutes for the trigger to catch up.
Practical Recommendation: In Make, use the "Run once" feature to manually trigger your scenario. Then, check the "History" tab to see the exact data Make received from Figma (or if it received anything at all). This is the fastest way to debug whether the issue is with the trigger condition or the connection itself.
Resolving API and Connection Errors
Other times, the problem lies with the connection itself. You might see errors in your Make scenario logs that mention API calls or authentication issues. This usually means something changed on either the Figma or Make side.
A common culprit is an expired or revoked personal access token in Figma. If you’ve reset your tokens for security reasons (which is good practice!), you have to remember to go back into your Make account and update the connection there. It's an easy fix, but just as easy to forget.
A broken workflow can feel like a major setback, but it's also an opportunity to refine your process. Once you fix a recurring issue, document it. This builds a robust troubleshooting guide for your team and makes your automations more resilient over time.
Another thing to watch out for is Figma's API rate limits. If you have scenarios running very frequently or processing a ton of data, you might get temporarily blocked. A great little trick is to add a "Sleep" module to your Make scenario. This forces a short delay between steps, which lowers the number of API calls you're making per minute.
This kind of proactive debugging is also critical before you hand off prototypes for testing. If your automations are flaky, it can disrupt the entire validation process on platforms like our own, Uxia. Ensuring your automations are stable means your prototypes will be ready for testing without delay, allowing Uxia's AI users to provide clean, actionable feedback on a reliable design.
FAQ: Your Figma Make Automation Questions Answered
Got questions about bringing Figma and Make together? You're not alone. When you start connecting your design workflow to external automation tools, it’s natural for a few things to feel a bit fuzzy at first.
Let's clear up some of the most common questions designers ask when they first step into this world. Getting these answers sorted helps you push past the technical bits and get back to what matters: designing better, faster.
Can I Fully Automate Design Handoffs to Developers?
Yes, and you can get surprisingly close to a fully "hands-off" handoff. One of the most practical scenarios we see involves setting up a simple trigger in Make: when a Figma frame gets moved to a specific page, say one named "Ready for Dev."
That single drag-and-drop action can set off a whole chain reaction:
It can automatically export all the necessary assets into a shared Google Drive folder.
It can then create a new task in Jira or Asana, assigned directly to the development lead.
Finally, it can populate that task with a direct link to the Figma frame and the asset folder it just created.
This turns a process that’s usually clogged with manual steps and meetings into a clean, reliable system. Developers get what they need, the moment it’s actually ready. No more guesswork.
What Is the Difference Between Make and Figma Plugins?
This is a really important distinction. Think of Figma plugins as tools that live inside the Figma app to enhance what it can already do. A plugin might help you find stock photos, check your colour contrast, or rename a bunch of layers at once. They’re incredibly useful, but their power is contained within Figma's walls.
Make, on the other hand, is an external bridge. It’s an automation platform that connects Figma to the hundreds of other apps your team uses every day.
A good way to think about it is this: a plugin helps you work more efficiently in Figma, while Make helps Figma work more efficiently with everything else—like Slack, Google Sheets, or your project management tools. A platform like Uxia is also an external bridge, but one specifically focused on validating the quality and usability of your design output.
How Does Uxia Testing Compare to Figma Analytics?
Figma’s built-in analytics are great for showing you what users are doing inside a prototype. You can see their click paths, how long they spend on a task, and even generate heatmaps from their sessions. It gives you solid quantitative data on user behaviour.
Uxia, however, is built to tell you why they do it. It uses AI synthetic users, tailored to your target audience, to simulate unmoderated usability tests on your prototype. This gives you the kind of qualitative insight you'd get from watching a real user, but at the speed of analytics.
Instead of just seeing a heatmap, you get think-aloud transcripts and a prioritised list of usability problems related to things like navigation, clarity, and trust. Uxia explains the user's intent—and frustration—behind the clicks, filling a gap that analytics alone just can't.
Is This Automation Workflow Difficult to Maintain?
There’s a bit of a learning curve at the start, but the trick is to start small. Seriously. Don’t try to automate your entire department’s workflow on day one.
Pick one small, repetitive task that drives you crazy—like the Slack notification example we talked about—and just automate that.
Practical Recommendation: Create a dedicated "Automation" channel in your team's Slack or Teams. Configure your Make scenarios to post a confirmation message there every time an automation runs successfully (e.g., "✅ Design Handoff for Project X completed"). This gives you a live feed of your automations and makes it easy to spot when something stops working.
Once a scenario is set up, it typically requires very little upkeep unless a connected app (like Figma) makes a major change to its API. The time you’ll save by getting rid of manual, error-prone work will almost always outweigh the small effort needed to occasionally update a workflow, especially if you follow the troubleshooting tips we covered earlier.
Ready to validate your designs with confidence and speed? Uxia replaces slow user testing with AI synthetic users, delivering actionable feedback on your Figma prototypes in minutes, not weeks. Get started with Uxia and close your feedback loop today.